
Systems (2) — Materials, Inventory, and Rates
How do we charge for stencils, ink, paper, and labor?

This is the second of a series of posts exploring systems in community print spaces. The rest (as they are posted) can be found here: (Systems from) Presses Kept Running.
I’m looking primarily at managing the consumables and labor for risograph printing—the best advice I received when trying to figure this all out was from Jessica Hoffman:
I am pretty positive that no matter how we all individually calculate costs, the total per project is roughly the same. And the price is both woefully under our actual labor cost and often higher than a [copy shop]…. We all seem to have somewhat convoluted calculations.
So here’s some of those convolutions!
First of note—in printshops with multiple methods of printing, riso is fairly unique in that almost inevitably the artists are paying for materials in addition to whatever they are paying for access.
For something like screenprinting, for example, the access fees usually cover communal materials, like emulsion and screens/frames etc.
Maybe this is because riso is a duplication process and being used at larger scales than screenprinting or fine art printing, or maybe it is because riso materials are a little more proprietary/dedicated (like tubes of ink for the drums on hand) and are harder for artists to self-supply.
PRINTING COSTS
It’s fairly common to break riso materials down into the cost per stencil and per impression (a single “copy”—one sheet of paper getting printed with one color of ink). I want to look both at what calculations we’re doing to figure out those flat material costs, and then patterns in how those are balanced with what the printshop users or members pay.
So the raw materials themselves:
Stencils in the US, from the main distributor (Hallagans) cost $64 + $25 shipping for a roll of ~215 stencils. That comes out to 41¢ per stencil.
Similarly, a standard ink tube from Hallagans costs $35–45 (though some inks, like White, Aqua, or Metallic Gold, are much more expensive) + $25 shipping. How many prints do you get out of that? It’s complicated! (More on this below.)
Next how they are actually consumed in practice:
One stencil is used to make one image that can be duplicated on as many sheets of paper as you want (in actuality, somewhere around 500–2,000 before you start getting significant wear and need to remake it—though most of us aren’t printing at that quantity). However, you frequently consume more than one stencil to get to a good image:
Machines that “idle” (re-ink the drum when it hasn’t been used in the last 6–12 hours) will generally use an extra stencil at the beginning of every print day.
You are often making a stencil, test printing, tweaking the design, and then making another stencil before printing—sometimes many times. So generally, the harder something is to print (complex values) the more stencils it will use up for each final image layer.
For the impressions—the amount of ink that is printed onto the sheet will obviously be different depending on the artwork—a sheet with a single line of text in a color uses far less ink with each print than say, a full page dark image. So there’s something in “coverage” that could be calculated—but the fractions are so small that it’s really difficult to measure. Generally it’s accepted in the riso community that even with really heavy coverage, a single impression is using less than 1¢ of ink. Same as the stencils though, there are many other ways that ink is consumed than in the finished prints:
The big one is the test prints needed to both fill the image with ink (and print out any “patchiness” that comes from dry ink in the drum mesh), get proper positioning, and just evaluate the print itself to see if changes are needed. This can be anywhere between 0 and 100 (on a bad day) impressions per layer.
A stencil also is not without ink costs—each time a stencil is removed from a drum, it is saturated with ink) you can feel the heft of it when you remove them by hand. We haven’t calculated how much ink yet (though have talked about weighing things to figure it out)—but it’s not insignificant.
Newer machines frequently lose between 5–10% of a tube of ink due to a quirk in how the riso determines (and records) that a tube is empty. (In the same way that we can’t really predict ink usage, the riso can’t either—so it just tries to pull ink from the tube and then checks whether ink came out or not—but this doesn’t always work, so it sets a little counter—if it “fails” in pumping ink a certain number of times it will mark the tube as empty and require you to replace it.)
There’s also mechanical differences! Ink is the source of errors in many drums—if it’s laying too thick or too thin on the page, or overflowing inside the drum, any single color might be putting out more/less than the expected ink for a project.
For paper, there’s two major patterns of supply (and most places are using some combination):
Artists are supplying their own paper. If so it’s important they have lots of information about what the riso likes to print and what it does not! (Maybe a range of weights, a note about uncoated, recommended stocks, etc.—even a library of samples with the paper noted on them). Alternately, in more precarious shops (like in schools, which have very abused machines), sometimes students are banned from bringing their own papers.
The printshop keeps some standard stocks available, frequently selling them direct to students or members, or otherwise folding them into material costs. Often this is a preferred text and cover in both white and natural, sometimes stranger stocks as well.
My favorite paper shop in a printshop was at Parsons, where they had a little side closet as the paper store, and different papers available by the sheet (tracking the different prices for each). In addition to the standard stocks they also had a lot of specialty stocks (a good imported black paper from Japan, a vellum that worked well on the riso, a number of the solid color Neenah papers, some stuff from French Paper Co., etc.) and an informal system for students to request papers they wanted stocked.
A few shops I’ve visited also keep some physical record + samples of how the papers they use take ink. Small Editions in NY has a very comprehensive materials library for the client binding work and things they do, while Small Works in Detroit keeps an archive of a single finished sheet from most projects. In my studio we were doing something similar: we had one drawer on a flat file as an archive, and asked people to drop a copy in there—then if we cross referenced their project ticket we’d know the paper. In future though I think it would be better just to jot the job information down in pencil on the print itself somewhere.
In addition to stencils, ink, and paper, there’s two other major sources of cost when printing:
Labor (a big one which we’ll hit on in more detail later)
Upkeep (maintenance, parts, space costs, other operations).
CHARGING FOR USAGE
Okay—so how do studios charge for printing in order to sort of account for all of this chaos? Largely it comes down to differences in how materials are counted and the upcharge that is attached to their base cost.
Counting patterns—AKA how we track stuff and/or quantify materials:
Lots of studios use the counters on a riso to determine actual material usage. By doing the math on the counters at the beginning and end of a print job you can determine almost exactly how many materials were used (again with some vagaries around ink). All risos before the SF/MF line have physical counters that increment with every impression and stencil—or “copy” and “master” in riso terminology (the newer ones have counters too, but they are accessed through the screen of the riso).
How are these actually recorded? I’ve seen 3 patterns:
Both bearbear and Tiny Splendor / Max’s Garage record things on binders beneath the riso. I didn’t take a close look at Tiny Splendor’s (each riso has its own binder, which makes tracking how an individual machine is doing pretty easy) but at bearbear’s, each printshop member has their own page, with one line for each print session—this makes it easier for artists to see how their total material costs are tallying up.
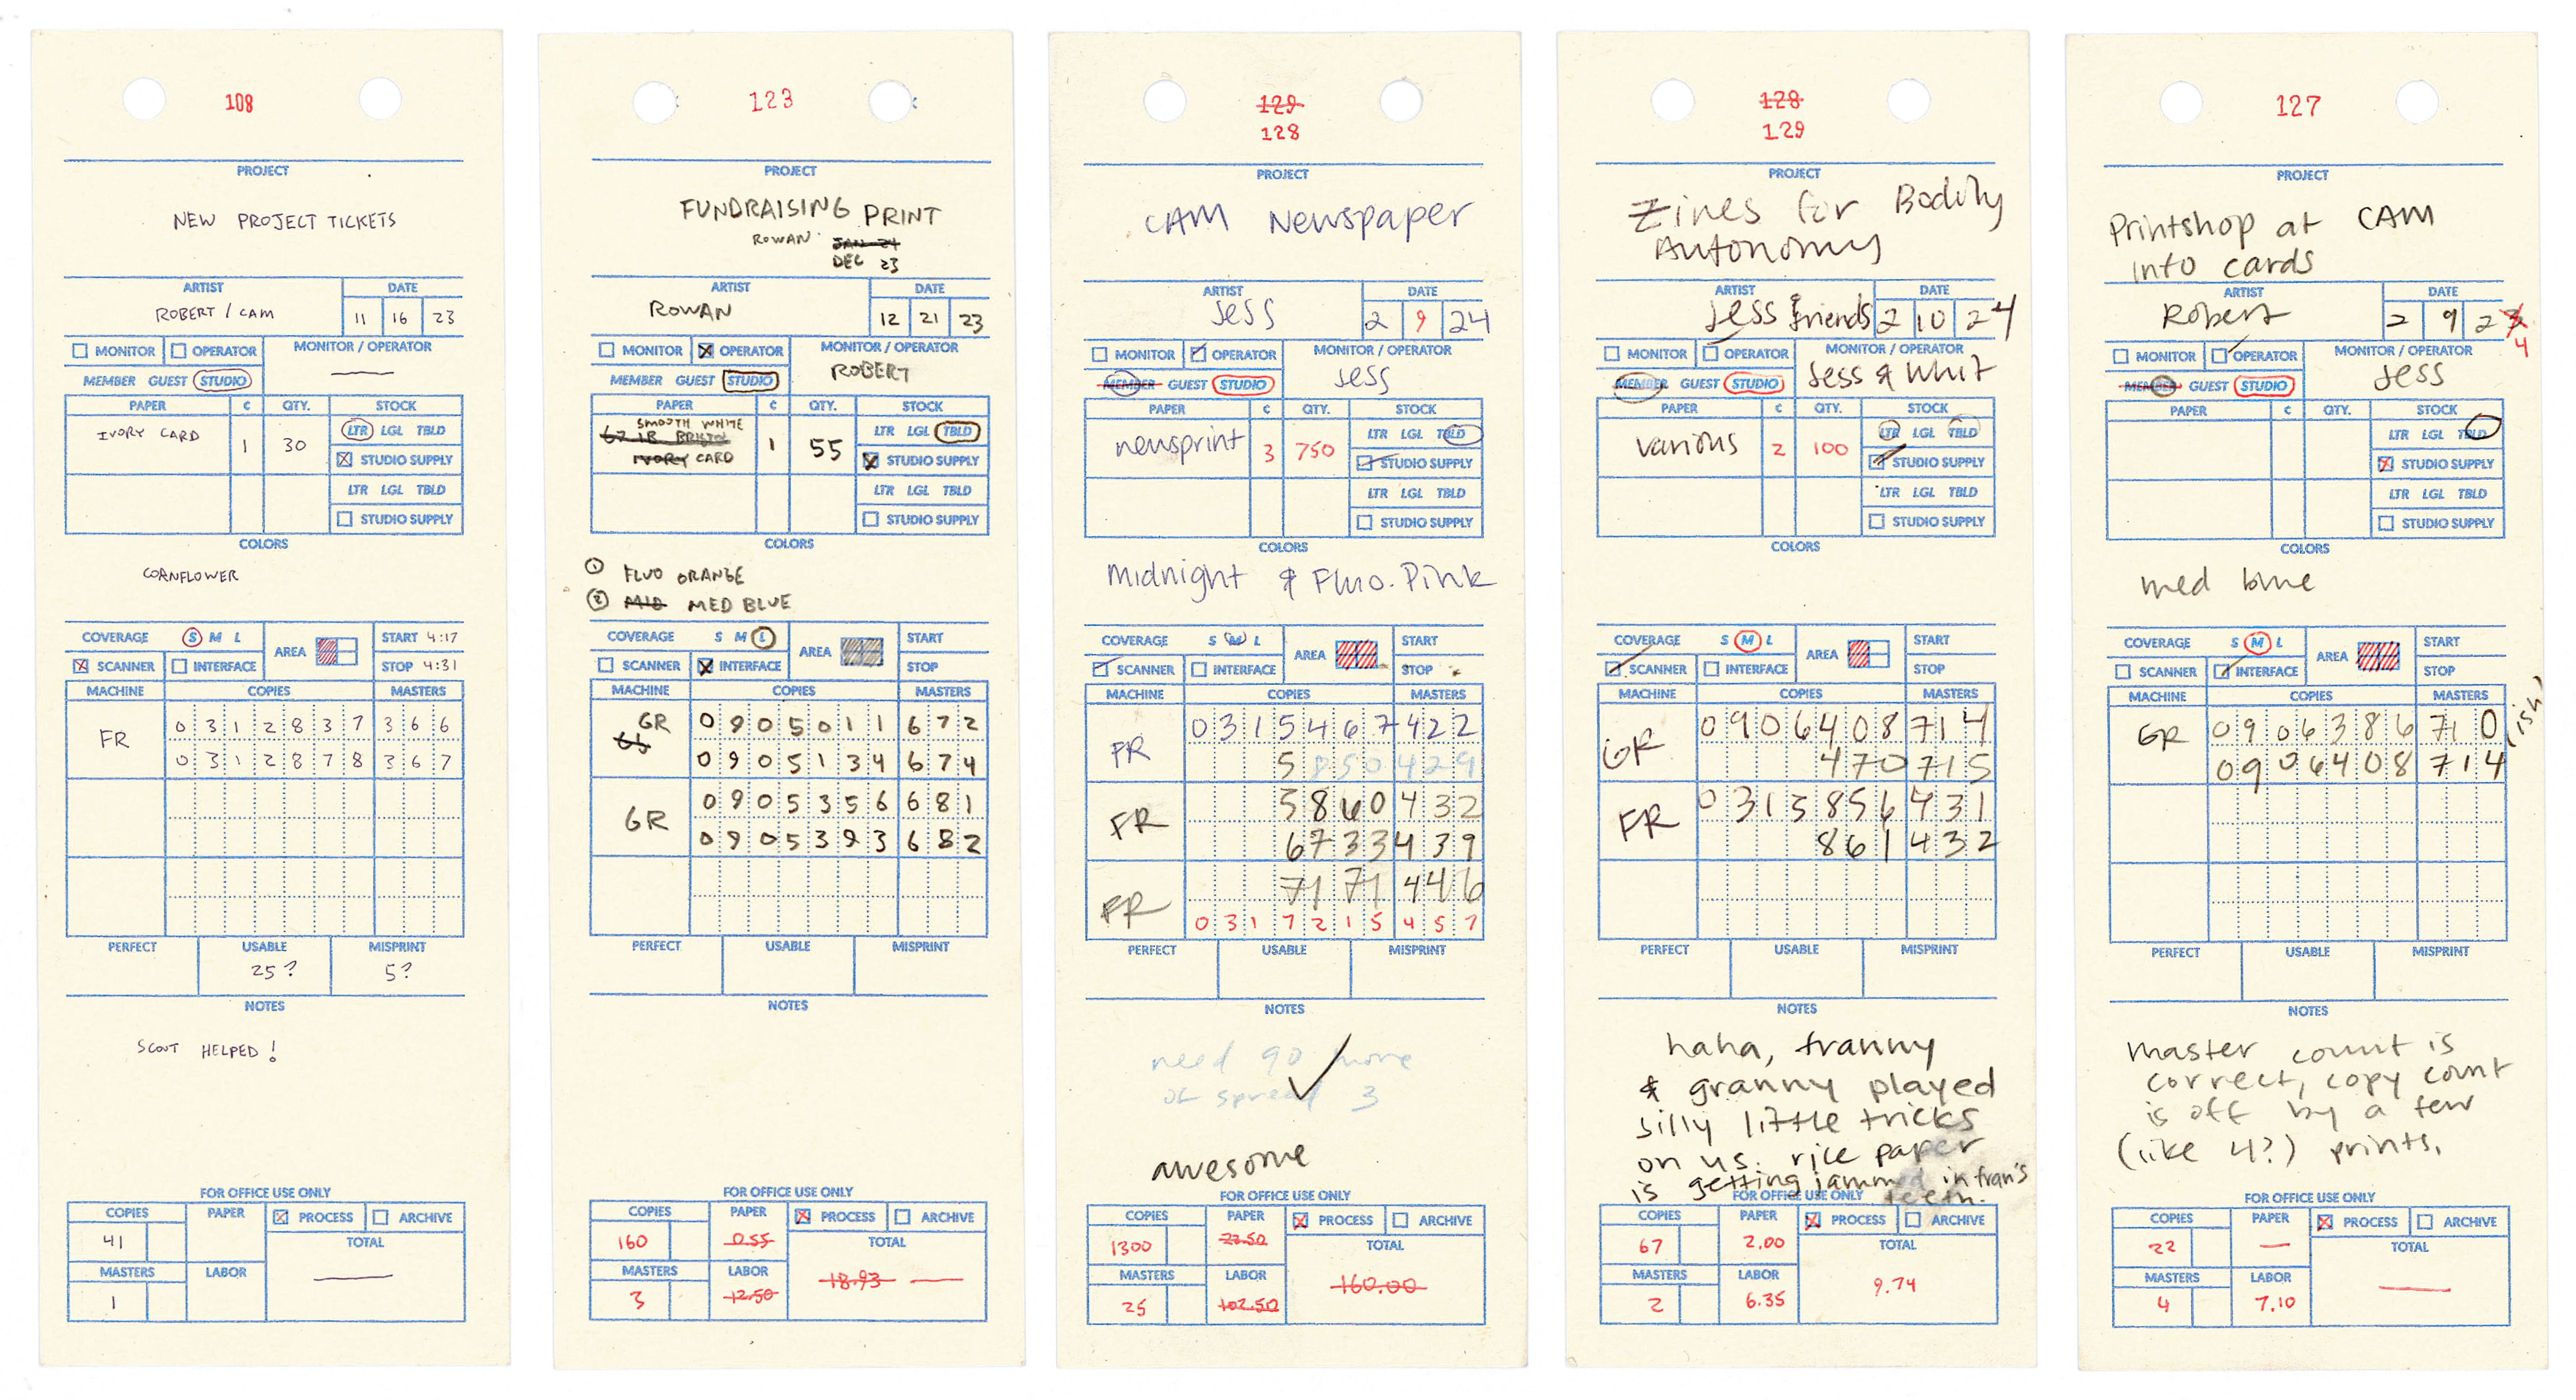
In my space, we had individual “project tickets”—whenever someone was printing they’d grab a blank ticket and fill it out over the course of the project, moving it over to a completed stack when done. This felt really good but did require some administrative labor to pull all those tickets into a spreadsheet every few weeks. I am working on helping Cornish College of the Arts and Studio Two Three implement similar ticketing systems.
There’s a few shops running purely digital models—mostly just with a spreadsheet or online form, sometimes with the newer machines’ lockout + carded entry systems. I may be misremembering but I think at least one press just has people take pictures of the counters at the beginning and end of the session, and text them to someone.
Some studios just charge based on the specs of the finished print job, i.e. number of colors per side, total number of sides (proportional to the number of pages in the project), and run size.
At the most extreme this means project printing that is absolutely fixed in scale—i.e. “100 copies of a 3 color print on 80lb tabloid sulphite costs X”—and there are no other options. This fixed rate model is seen more in job printing or in print promotions though, usually community print spaces are more open-ended in the size and shape of the projects that are printed there.
Sometimes (especially in job printing) a project is estimated ahead of time, and that estimate becomes the fixed rate for the project (it’s sort of “counted ahead of time”). In this case it’s really important for the estimator to build in the overages, the extra materials that need to be accounted for along the way (more on this below).
Rarely, but in a few notable cases there’s some pretty complex counting going on:
My first riso printing experience was at the IPRC in Portland, where they had coverage-based rates: an impression normally cost 15¢, but one that had a really low coverage (a few lines of text or a little stamp sized image—color is used in this way as sort of an accent) only cost 10¢. This was a little harder to track but felt nice and equitable.
The system I implemented at my studio was even more complex than this: we tracked the coverage both in density of image (using a S/M/L system) and how much of the page it takes up (on one end of our spectrum was a mostly text, half-letter print, on the other end was a full sheet, tabloid photograph or heavy color fill).
Many studios have a way of reimbursing people for the machine messing up (as risos are very temperamental). Generally this looks like deducting stencils and/or impressions from the total when a printing error was the fault of the machine. (For example, I would instruct people in our space to note if they had to run the inking/idling action to clear up a dry drum, and if so I’d deduct the master that consumed.
Simplification though, is usually the rule of the game (especially if people are doing their own tracking)—it has to be easy to determine the printing cost afterwards (and before) otherwise material costs will just get lost/confused.
And then the upcharge:
Stencils are almost universally priced up, ranging from between 50¢–$5. Generally this is thought of as covering any extra stencils or ink that isn’t factored in elsewhere (or going to those upkeep costs).
An impression is usually charged somewhere between 1–25¢ with a cluster of common values somewhere around 10¢. This is meant to cover the ink loss and often the upkeep as well (using the model that an “impression” marks a small unit of wear on a machine—or otherwise signifies a small fragment of the extra work needed to keep that press happy).
To simplify things, there’s also sometimes a big extra upcharge in either stencils or impressions that totally absorbs the cost of the other (so you’re only really tracking one thing). For example, if you’re charging $10 a stencil, a 4-color project will already cover almost a full tube of ink—likely much more ink than is actually being used, even if you’re making 1000 copies.
Many places try to incentivize artists to print more copies, so there’s also some downcharging (more on this in the estimation section).
A final note: often studios will implement different per-material rates for different kinds of users. An “at-cost” (no upcharge) rate might be applied for internal projects, social + activist printing supported by the studio, etc.—or higher rates might be used for lower-level members or job printing. In fact, different models are quite frequently used for different kinds of printing within a single printshop. I think though, that the common law of the land for equitable work is transparency in pricing.
ESTIMATION
Almost inevitably we need to be able to predict a cost of a project ahead of time, regardless of what method is being used to charge for it. Usually this is the responsibility of the artist, but the printshop provides tools or resources to understand their pricing.
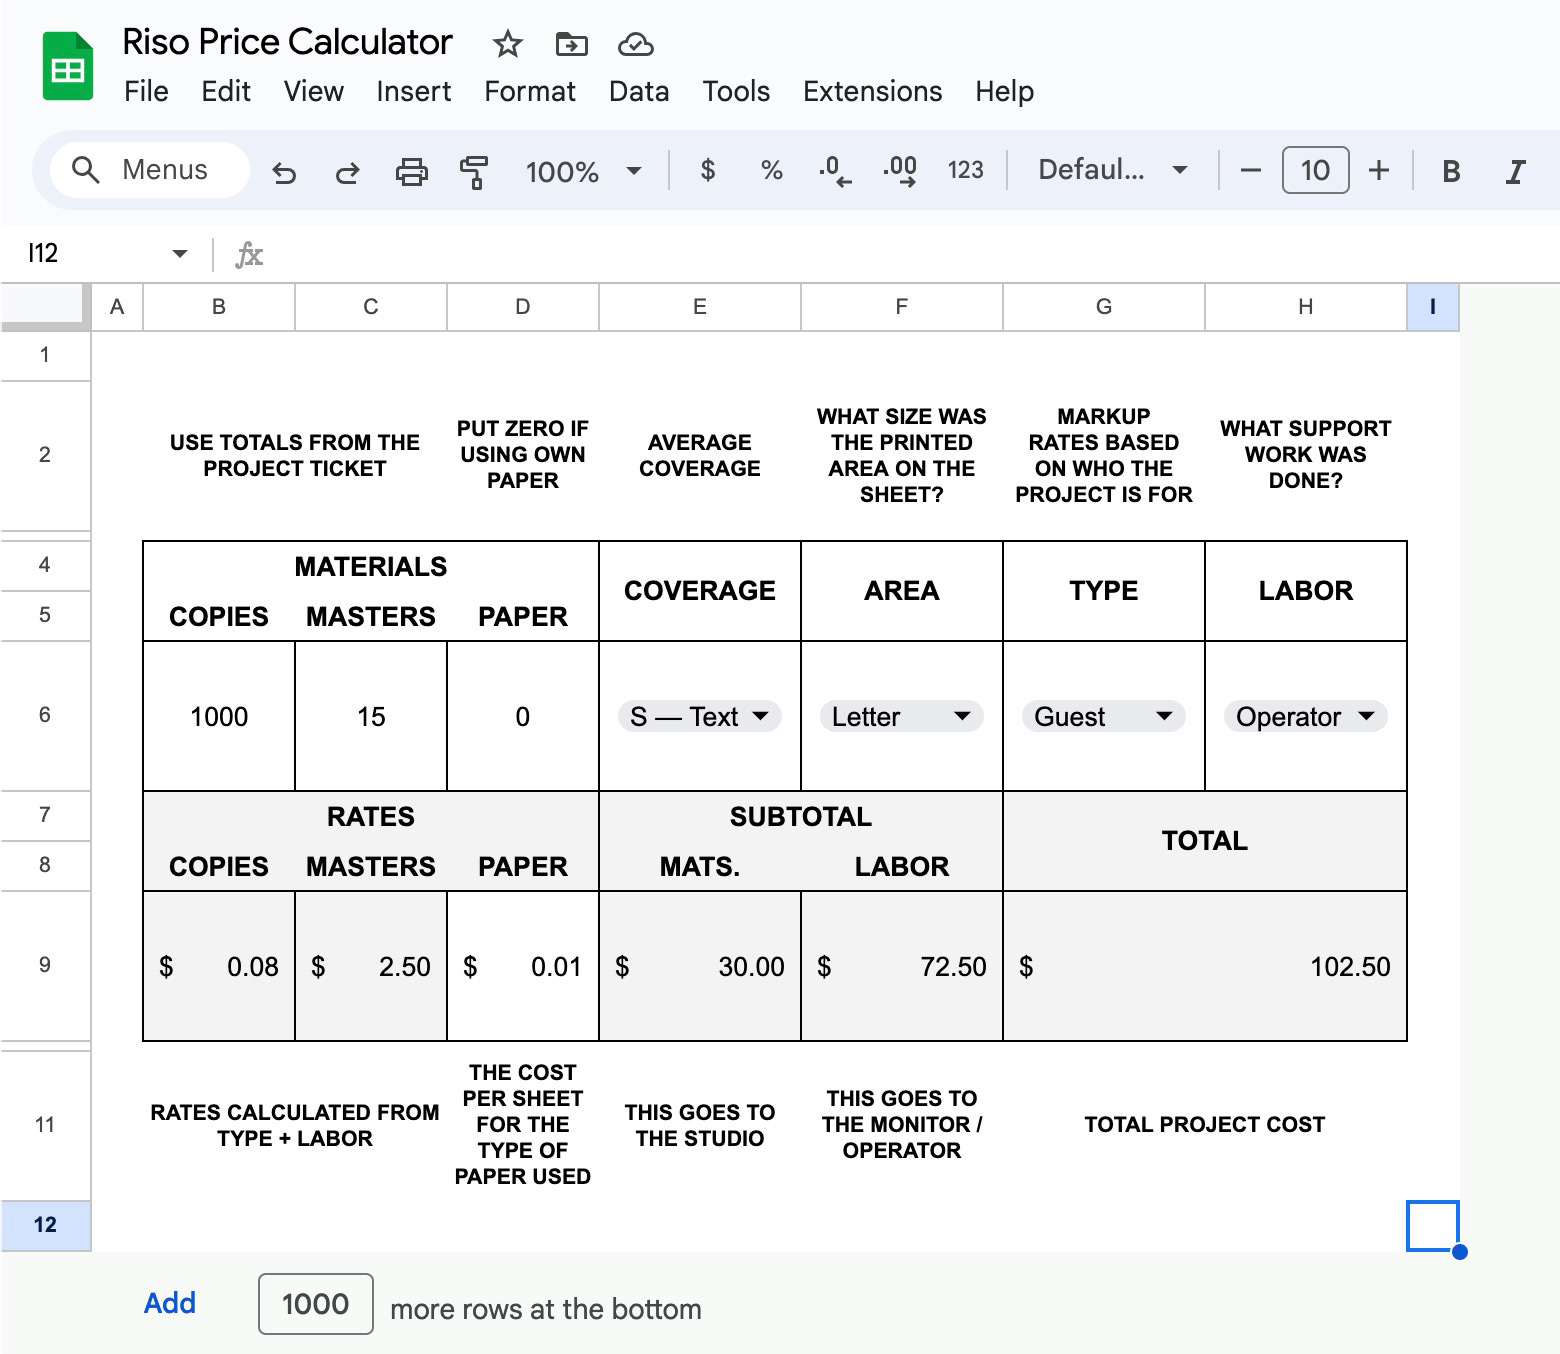
So how do we actually go about estimating projects? Well, generally it comes down to plugging the things we know about the project into a calculator of some kind—each studio sort of has their own calculator. Usually this includes:
A breakdown of the physical form of the project which results in an idea of how many sheets, stencils, and impressions are needed per unit (to make one copy of the book). Sometimes this is just mental math from an experienced printer, sometimes it’s calculated based on the trim size, number of colors, number pages, and paper size. (Though for custom stuff you sort of always need to do some figuring by hand to determine actual material needs.)
A run size, or breakdown of multiple run sizes (often the run size is the last variable—you print as many copies of the thing as the budget or materials on hand allow).
A calculation of overage (how many extras you need to make in order to compensate for things going wrong). There is always an overage for the total number of copies, but sometimes a separate overage is calculated for stencils too.
In my calculator, copy overage was based on the complexity of registration (which is a factor both of the number of colors and the kind of image/artwork) and binding, and whether or not any of the papers were weird stocks (i.e. heavy card or weird stock), while stencil overage was based on the complexity of tonality of the image (i.e. the likelihood that the color balance would be wrong and I’d need to adjust the file and remake the stencil). So a text-based chapbook on 20lb bond would include a 10% copy overage (assuming basic paper feed quirks) and maybe 1–2 extra stencils total, but a 3 color photo zine on newsprint would include a 25% overage and twice the planned stencils.
The flat material rates themselves (per copy, stencil, sheet/ream of paper).
Any quantity-based discounts—rule of thumb is that riso is a good printing method for 50–500 copies of something and is for folks who have more time than they have money. Usually the per-unit cost benefits of printing more copies rather than fewer are built into the cost of labor vs the cost of impressions, but sometimes it’s made explicit in the calculator too (e.g. 10% off for 200+ copies). Sometimes this discounting is also included in non-estimate printing too, just using the totals on the ticket/binder.
Labor rates for the printing and any in-house bindery work or pre-press work.
Here’s some of my favorite calculators readily available:
De Kijm (Den Haag) https://www.dekijm.nl/riso/prijzen-a3
SO-RI (Antwerp) https://so-ri.info/print
Risotto (Glasgow) https://risottostudio.com/products/order-bespoke-risograph-prints (also check out their print simulator)
Ink’Chacha (Hong Kong) http://www.inkchacha.ink/calc/
Fidèle (Paris) https://fidele-editions.com/en/impression-riso/simulateur-de-devis/
And my own: https://docs.google.com/spreadsheets/d/1wBMCXt-KXmbdR8V_poA42zgf3OW_ncjDEYfcysqGe-s/edit?usp=sharing (calculator on one tab, estimator on the other)
Lastly, if people are creating their own estimates, or just trying to ballpark a project, I’ve found that it’s incredibly difficult to interpret the rate per copy/stencil into a full project cost. To accommodate for that I’ll provide some “sample” projects and what they cost:
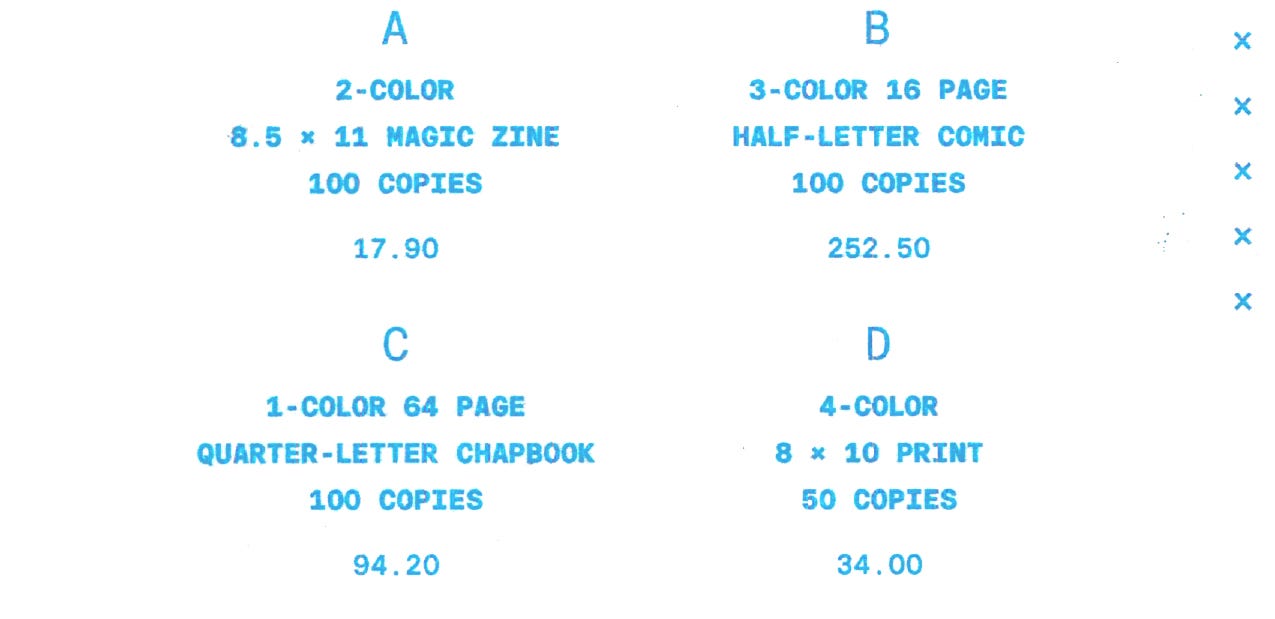
KEEPING INVENTORY
A momentary sidestep to talk about “inventory,” AKA how we keep the supplies in stock. For each machine, a printshop needs to have a few rolls of stencils on hand, and for each drum, a few tubes of ink.
Stencils, for the most part, are pretty straightforward—each machine can take a certain kind of stencil (sometimes they are interchangeable between models, sometimes not)—printshops can start to gauge how often they are going through a roll and keep enough on hand so that they never run out. Generally they keep okay (though leave them in their boxes and away from moisture—direct light or water can damage them), so you don’t really have to worry about them going bad.
Riso Kagaku has officially discontinued materials for the RA, GR/FR, and RP lines, which means stencils are in limited supply. However the new stencil material works just fine in older machines—the only major thing that has changed is the shape of the cardboard tubes they’re rolled onto. These tubes are held between two plastic “flanges” in the riso, so by modifying the flanges (or 3D printing new ones) to fit the new tubes, you can pretty easily run new stencils in an old riso.
Ink is slightly more complicated, because different colors are often used at different rates in a studio, and because ink actually does go bad (and old, separated ink is a major cause of mechanical problems in the riso).
Most studios have a just sort of “as needed” policy for inks—if the supply is low we order more. This is made much easier by having all the ink tubes clearly visible (i.e. not in their boxes, not in a closed cabinet), plus the inks are pretty (and make a nice approximation of your palette) and riso people like showing them off!
For places that keep a more regular inventory, they are either:
Ordering a tube each time one is replaced (a printshop I visited had an “empty tube corral”—put the empty here so we know that we need to order another of that color).
Or having a target inventory and periodically (monthly, quarterly) checking the stock and ordering what’s needed to stock back up.
For all of these methods I recommend having a different target for different ink colors, based on popularity—for your less popular colors (white + pastels + tertiaries, probably) you might only need one tube on deck, for your more popular ones (primaries + fluorescents, probably) you might need 2 or 3, and for your keys (Black, Midnight, Steel, etc.) you might need even more than that.
When inks go bad, it’s because the oils in them have separated out from the other components—symptoms include: a yellow/orange transparent oily residue seeping from the tube or present at the nozzle, a change in consistency (getting thinner/runny—good ink is like yogurt—when it’s really bad you can hear it sloshing like water), and a tacky sediment forming (gummy ink). Generally this happens within 2–5 years on the shelf. But! All is not lost—ink can be remixed fairly easily—my preferred method involves using a paint-mixer drill-attachment in the tube (after removing the black plastic cage + plunger).
Because of the risk of separated inks messing stuff up, I recommend that shops that keep or have a large inventory of ink also have a plan for handling separated tubes. At both Studio Two Three and VCU I have recommended that they quarantine bad inks (where they won’t be snagged by an unsuspecting member/student) and then periodically have a “mixing day” and putting them back in circulation afterwards.
The same RA, GR/FR, RP discontinued supplies issue exists with the inks—no new ones are being made. However there’s some easy solutions to use newer inks on older machines too. Newer machines use an RFID sticker on the tube for “version control”—without the right sticker the drum won’t recognize the tube. The older machines are more mechanical, a little plastic tab on the end of the tube pushes a button inside of the drum—there are multiple buttons, and it has to push the right button to be accepted by the drum (generally this is to differentiate types of tubes for different models of machine—all the colors use the same tab for a type of tube). So the methods of bypassing this are:
Convert the tube to something the drum recognizes by (1) removing the smaller nozzle insert with some pliers, and (2) adding a tab to the tube (made out of paper, 3D printed, etc.) or otherwise hacking the drum so it always thinks the correct button is pushed.
Or, transfer the ink from a new tube to an old tube. My preferred method for this is using a nut from a hardware store (M24, 3.00 pitch) to join two tubes (empty below, filled one above), and then manually plunging ink from one to the other. You have to go a little slow and make sure the plungers don’t get crooked/pop out, and the receiving tube can only be used a finite number of times before it gives up, but it’s very fast and effective.
NOTES ON LABOR
Labor is obviously a major part of things (I describe riso as a practice for printers who have more time than money), but probably the main thing to point out is there is the constant habit (especially among smaller or younger presses) of undervaluing labor, both our own and others’. And then also getting into how labor is tracked and paid (even if it is not enough).
Here’s sort of how we are all underpaying ourselves or being underpaid (I am guilty of it and see it everywhere):
Having rates that are too low or not a livable wage—I like using the MIT Living Wage calculator for looking stuff up when researching and figuring out rates.
Depending on uncompensated volunteer labor in the printshop. At minimum, labor from printshop members should be in exchange for discounted or free rent or print compensation. But actually paying people for their time is of course, the gold standard.
There was a bit I remember reading once and liking (maybe in A Toolkit for Gathering, or maybe in something by Temporary Services, one of the anthology books, or maybe Genderfail) that talked about the resources and services you might be able to offer in trade if you can’t pay cash. I do a lot of work for trade or in-kind donations, so it was nice to see it listed out. It was things like: publishing their work, taking photographs (documenting art, headshots, etc.), materials, copy editing, connections, labor, etc. It’s something that I also tried incorporating into organizing events with guest artists—if we can’t afford to pay you, at the very least this thing will be well documented and a small publication or print will come out of it for you.
Requiring and providing what India Johnson (in the excellent End Application Fees!) refers to as unpaid “admin labor” (i.e. applying to competitions—and often paying to do so), grant writing, documenting work, updating websites + portfolios, community organizing, etc.).
Generally a lot of printshop life (between printshops) exists on a trade and gift economy—we tend to be generous group (in no small part because this industry doesn’t make much, so we are all already somewhat disengaged from capital-driven value systems. However, we can often get taken away with that generosity, especially when extending it to institutions or larger publishing operations. Even amongst each other it is very easy to overextend and give so freely that we are find ourselves in precarious circumstances—and this is largely unnecessary, as we are also all generous in distributing resources throughout our community where they are needed. So it pays (literally) to ask for fair payment and exchange from each other, and makes our collective environment healthier too.
An excerpt from one of the books I’m currently reading—this is Binna Choi talking about (drafting for) The Book Society in Publishing as Method, an anothology on small-scale publishing from the Asian diaspora:
The Book Society is a society in which the value of money gets confused. / Books help you breathe so you, one way or another manage to make a living. / As you already may have sensed, it does not help you to be rich. / In fact, it might already have discouraged your desire to be rich. / Still, you need money. (Get it anywhere you can) / And dream of an economy in which the only thing you’d negotiate is a tree or forest, nothing else.
I am very thankful to all the press friends who have been helping me figure out how to make a living doing this, particularly Amelia Greenhall (Anemone), Rachel Hays (Taxonomy Press), Jessica Hoffman (Paper Press Punch), Alex Barsky (Zine Hug), Jess Artigliere (Ritual Birth), and India Johnson (Late Night Copies)—as well as some friends I haven’t met yet who have documented and published their own operating budgets: Be Oakley (Genderfail) and Press Press—and early business/practice guidance from my mentor Natalia Ilyin.
A request: when we are helping artists learn about self publishing, including estimating costs, we should also include time and labor estimates. It is only half the conversation to demonstrate to artists how paper and ink and things can be cheap when DIY’d—we also have to talk about how much of your time, energy, etc. publishing projects will take—and if we were really good about it we’d emphasize that those costs have to be folded into the economic stability we’re aiming for.
So how is labor charged? Well no reinventing the wheel here—there’s three basic patterns: (1) hourly, (2) salary, or (3) within the material markup. One way or another, it is often folded into what people are paying to print from a project-to-project basis.
Hourly payments tend to look like a mixture of the following:
The hourly shift rate for the people manning the studio floor (helping out with printing, mentoring, managing the supply, etc.).
Fixed time tasks attached to printing—some I’ve seen:
A booking fee for a time slot (to pay for setting up the studio).
A mandatory 1hr consulting fee before printing a project in the space (Outlet PDX and a few other places do this, at least for people’s first projects).
A one-on-one tour or initial training payment (in my space the printshop would pay artists a flat fee for bringing people in and helping them test print—that cost wasn’t forwarded to the artist so that they could have some free trial printing—but the labor for it was covered by funds set aside in the shop).
Tracking and invoicing (time sheet style) for one off smaller tasks (meetings, cleaning + organization, developing systems, etc.).
Salaried positions are almost exclusively happening in the larger community studios, and are covering either day-to-day studio management or other administrative tasks. (While a stable salary for arts labor is obviously an amazing resource for an artist, from what I’ve heard these roles often also become catch-alls in terms of tasks + expectations—when on salary you are the de facto pinch hitter for all studio needs, which can itself become exploitative + exhausting).
Labor paid through material upcharge is quite common, but is also extremely wishywashy. The thinking goes: if I charge more than the materials actually cost, I can use whatever is left over to pay myself. But when the material usage is also frequently unclear, and when studios have constant other expenses they need to pay with this income, it’s really difficult for there to be any sort of direct correlation between the labor you are putting in and “what is left over.” More often than not, this ends up just being chalked up as a loss and labor is unpaid.
In my studio we tried a system for about half a year, where a concrete rate-per-material was paid directly to the person doing the printing labor (when they were printing for another artist or the studio). So this would be: the artist is being charged 5¢ per impression—2¢ of that is going to the studio, 3¢ is going directly to the operator.
This worked to a point, and it was a good way to guarantee that everyone doing communal work was paid for it, however it wasn’t very accurate and didn’t match to time. Some jobs were done really quickly, so the hourly was pretty good. Others took far longer and resulted in a very low rate. And one thing that was completely removed from this was payment for setup + cleanup time (the heaviest of which was file setup, if the operator was helping with this too).
Ultimately we decided to simplify things, and have the operators charge guest artists materials for the studio, and then pay them for their labor directly based on whatever rates or system they, individually, wanted to set.
That’s where my notes end for this one—next is “Maintenance Procedures,” my personal area of expertise—here we’ll talk about systems for what to do when things go wrong and machines are out-of-order.
I work at a school and oversee two student-facing Riso labs. Our pricing structures for students fall neatly in line with your per master and page costs (though on the low end - $4 per master and $0.01 per color per page, except Gold, and the minimum charge for anything being $5). What I wanted to share, however, was our tracking of ink usage.
We have 14 drums for our machine, and we *try* to track how many impressions each tube of ink will cover. Averaged out over many years, we're finally getting some usable data.
Accounting for questionable data-keeping on my technicians' part, it seems as though each tube of ink tends to last in the 3000-4500 impression range, with some tubs falling short in the mid 1000s, and some possibly going as far as the 9000s.
I'm enjoying these posts. Thanks.